My first attempt at making 3D.

Resting in H.E.L.L
Banned
Joined
Dec 1, 2009
Messages
234
Best answers
0
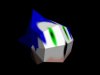
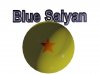
Yay. The ball has a real star in the center and the ball is see-through like glass. (You can see the "S" in Saiyan behind it)... but I wish I could figure out how to get it shinier without making the star inside of it lose it's color.

DragonBall.jpg


Anyways, I'm happy for now.
 
I am no more
✔️ HL Verified
Joined
Nov 26, 2012
Messages
924
Best answers
0
In which application did you make this ?
 
I am no more
✔️ HL Verified
Joined
Nov 26, 2012
Messages
924
Best answers
0
You can make it shinier by increasing specular (or what is it called in 3d max?) intensity of object.
 
Resting in H.E.L.L
Banned
Joined
Dec 1, 2009
Messages
234
Best answers
0
i did, but... i guess what i wanted was an extremely shiny almost transparent metal looking shell.. i guess maybe a dragonball should have more than one layer, or maybe i need to render in HD but then the star INSIDE the ball always seemed to lose its red color inside of the ball.. still new to lots of stuff here.
 
I am no more
✔️ HL Verified
Joined
Nov 26, 2012
Messages
924
Best answers
0
The most important thing in 3dmax and pretty much in any 3d rendering/modeling app is to experiment till you get your result...
 
Resting in H.E.L.L
Banned
Joined
Dec 1, 2009
Messages
234
Best answers
0
Sonic Updated! I played with vertex's a bit more and made a new face in photoshop, but now I have new questions.... I had to tile the face to get it to fit correctly... Is there some other way? Because as you can see, the spikes on the back of his head are showing his face.

Is there some method of math using the amount of polygons in 3DS, and correlating that to the amount of Polygons in Photshop? Or, what about their height/widths?


Sonic2.png
 
I am no more
✔️ HL Verified
Joined
Nov 26, 2012
Messages
924
Best answers
0
Sonic Updated! I played with vertex's a bit more and made a new face in photoshop, but now I have new questions.... I had to tile the face to get it to fit correctly... Is there some other way? Because as you can see, the spikes on the back of his head are showing his face.

Is there some method of math using the amount of polygons in 3DS, and correlating that to the amount of Polygons in Photshop? Or, what about their height/widths?


View attachment 2170
To map a texture on model , you have to :

1)Make a UV map of the model (It is possible in 3d max)
2)export the UV map
3)Add texture to the UV map in photoshop or other image editing software
4)import the UV map into 3d max
5)Set models Texture to UV map type(or something like that)
6)apply the UV map to the Model

It should appear correctly.
UV map basically lays out the whole model on one plane so you can apply the texture correctly.
 
Resting in H.E.L.L
Banned
Joined
Dec 1, 2009
Messages
234
Best answers
0
To map a texture on model , you have to :

1)Make a UV map of the model (It is possible in 3d max)
2)export the UV map
3)Add texture to the UV map in photoshop or other image editing software
4)import the UV map into 3d max
5)Set models Texture to UV map type(or something like that)
6)apply the UV map to the Model

It should appear correctly.
UV map basically lays out the whole model on one plane so you can apply the texture correctly.
OMG you make it sound so simple! This gives me hope.

edit: i found this amazing tutorial, thanks to you!! Thanks!! Check it out if u want to... I have it Favorited now. http://www.youtube.com/watch?v=Bn4q-onOzBs
 
Last edited:
Resting in H.E.L.L
Banned
Joined
Dec 1, 2009
Messages
234
Best answers
0
Sweet... Man, now that I know how to UVW Unwrap, how the hell do I wrap!? lol.
 
I am no more
✔️ HL Verified
Joined
Nov 26, 2012
Messages
924
Best answers
0
Sweet... Man, now that I know how to UVW Unwrap, how the hell do I wrap!? lol.
Basically you make the UV map the texture of the object and make the texture orientation to UV map (as long as i remember) (Also try to check out some other tutorials on texturing)
 
Resting in H.E.L.L
Banned
Joined
Dec 1, 2009
Messages
234
Best answers
0
I'm getting better at this! ... Not sure why there's a triangle missing from the tip, because it's not in my Viewport... I did take a polygon out of there earlier, but.... Oh well! Check the progress ;-)

WoodSword.png
 
Resting in H.E.L.L
Banned
Joined
Dec 1, 2009
Messages
234
Best answers
0
What's up with THIS? Can someone tell me why this bump map is not working?

Whats Wrong With Bump Map.jpg

edit: I figured it out... there weren't enough pixels in my bump map.
 
Last edited:
I am no more
✔️ HL Verified
Joined
Nov 26, 2012
Messages
924
Best answers
0
Usually bump maps work like this : The bump map takes the bright and dark spots and make them differ in the depth, so you can't make a bump map with only one color (except if you assign a cloud texture to it and make it invisible)
 
Resting in H.E.L.L
Banned
Joined
Dec 1, 2009
Messages
234
Best answers
0
Usually bump maps work like this : The bump map takes the bright and dark spots and make them differ in the depth, so you can't make a bump map with only one color (except if you assign a cloud texture to it and make it invisible)
According to google, it only makes it APPEAR different in depth.... The map seen above had white and black and some grey in the middle and low pixel count in photoshop... so I took out the grey and changed the pixels to 1920x1080 and it seems better now...
 
Resting in H.E.L.L
Banned
Joined
Dec 1, 2009
Messages
234
Best answers
0
I could have added the little red rectangle to this, and made better textures, and made the glass transparent, but I thought I'd just throw this out there as a preview... So far so good for my first DBZ item? I put a custom bump map on the black piece to make it look like Headphone Cushion material.

ScouterComplete.jpg

And here's the item i modeled it after.

dragon_ball_z____scouter_by_camarinox-d2xqma0.jpg
 

Users who are viewing this thread

Top Bottom